
Cygnett Smart Home Starter Kit (review)
Apple HomeKit was introduced back in 2014 and really stepped up its game in 2016 with the release of iOS 10 and the new ‘Home’ app. Four years later, and support for Apple HomeKit devices in Australia is still very minimal. With popular brands like Aqara and Lutron still not bringing their range to our shores and other brands such as Logitech and Eve being shockingly overpriced, it seemed Australia would be left behind with just the popular smart lighting brands such as Phillips Hue and LiFX, or so I thought.
The Australian HomeKit game changed in 2019 with popular phone accessory brand Cygnett announcing their new range of smart home devices including smart light bulbs, power outlets, temperature sensors, motion sensors, door & window sensors, and smart control buttons. The biggest part of this announcement was that these devices would all be compatible with Apple HomeKit.
Despite this news, it seemed there wasn’t much chatter about these game-changing products online and I myself did not even find out about them until earlier this year. A few weeks ago I had the joy of finally purchasing their Smart Home Starter Kit for AUD$200. After experiencing the products for a couple of weeks I can finally share my thoughts on these products with you as well as examine its features, uses, and pros and cons.
PACKAGING/FIRST IMPRESSIONS
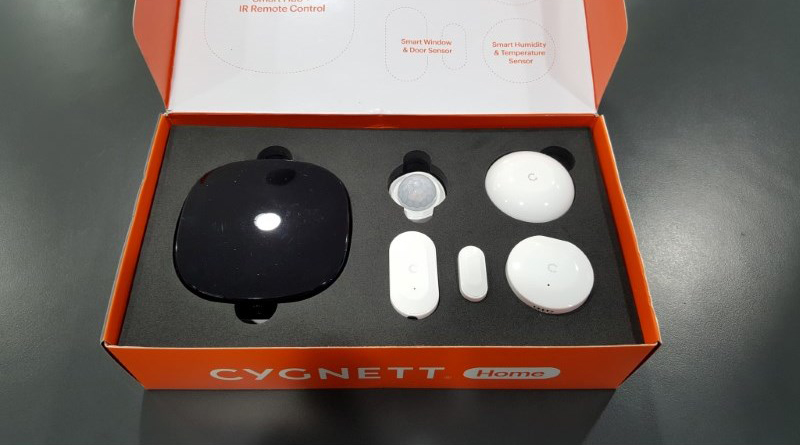
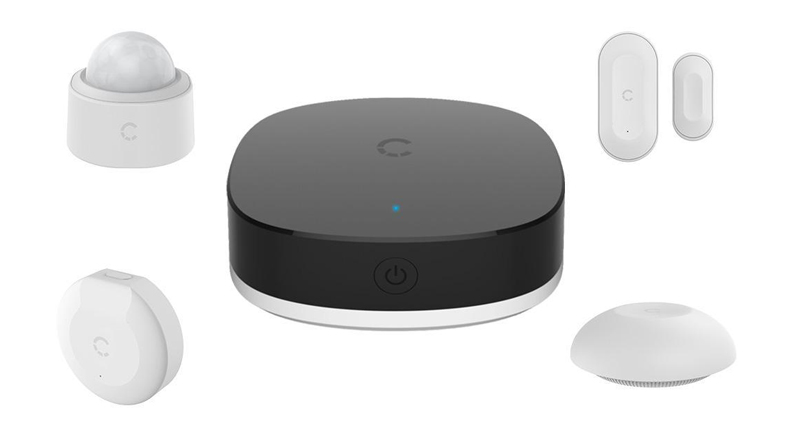
The first thing I noticed about the Starter Kit was that it came in a surprisingly small box which initially had me thinking: “they’ve packed a hub and four sensors into this?”. When I finally had a chance to open the box I was amazed at how small the hub actually was. It didn’t take up much space and was able to fit on my desk without obstructing anything else.


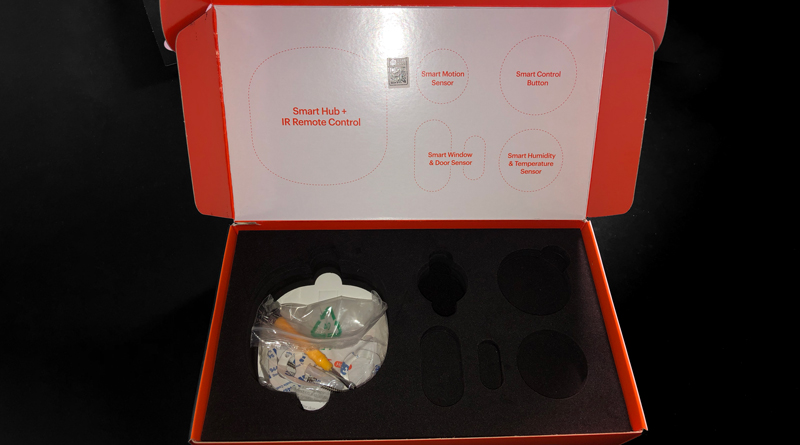
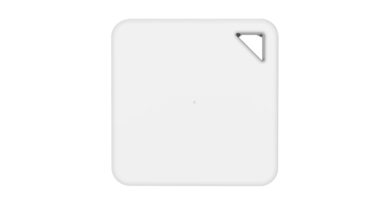
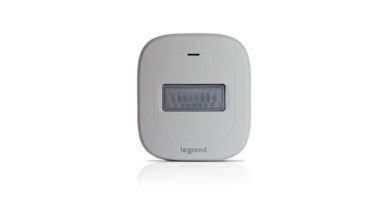
Also included in the box was one of their Temperature/Humidity Sensors, a Motion Sensor, a Smart Button, and a Door/Window Sensor. The devices were quite compact and I could tell that they wouldn’t be an eyesore and could blend into their surroundings. The devices were securely packaged with foam inserts and the exterior of the box lets you know that this is a professional, high-quality device.
SETUP
Setup of the smart hub was quite straight forward and required plugging in the hub using the include Micro USB cable. There was no adaptor for this so I had to use an old iPhone adaptor. A few seconds later, the hub was ready for pairing.
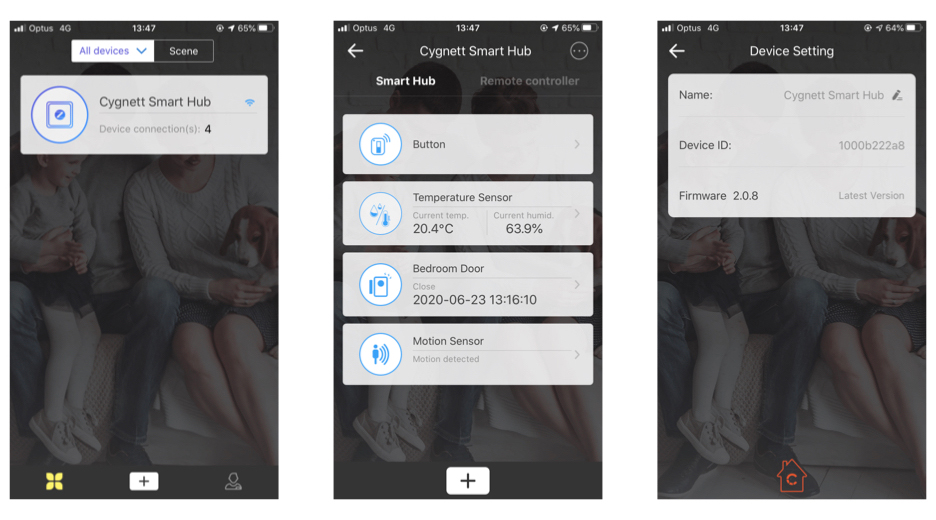
All that needed to be done was to download the Cygnett Smart app, register an account and pair the hub. Note here that you need to select Apple Home Setup and you will be redirected to the Home app where you scan the HomeKit code (that is plastered in multiple locations on the box, in the instructions and on the hub itself) and it will return you to the Cygnett app to finish the setup by naming the hub. Immediately I noticed a firmware update was available, however, both of my attempts failed to which I reset the hub and tried again which still failed. I wasn’t sure what the issue was so I ignored the update and continued with the setup. Later I noticed that the Hub did in fact update the firmware itself so I put it done to teething issues.
With the hub connected, it was time to set up the devices. It was a simple process and you just need to use the included screwdriver to open the backs of the devices, remove the battery pull tab and then hold down the pair/reset buttons on the devices. Move to the Smart App where you can press the “+” button, or alternatively press the power button on the hub, and it will search for the devices and pair them to the hub. You will know when the hub is in pairing mode by a vocal feedback message.

Once this is done you can move to the Apple Home app where the devices will appear and from there you can customise their name, locations and icon. It is important to note that the Cygnett Smart app doesn’t really give you many options to modify and automate the devices however it does show you logs of detected motion, doors opening and closing, and when buttons are pushed.
Once the devices are setup you can peel off the adhesive backing and stick the devices onto the wall. My concern with this was that the adhesive covered the backs of the devices where you need to open them to access the battery so when it comes to replacing batteries you will need to also replace the adhesive. Cygnett does cover you with extra adhesive for the first round of battery changes but after that, you are on your own to find a solution.
INITIAL THOUGHTS
My first instinct before mounting the devices was testing the range of the Smart Button, so I moved through different areas of my house and tested it out. Surprisingly, it worked more than 40 meters away which gave me high hopes for buying additional buttons for around the house. I didn’t have a chance to test the range of the other devices but I would presume the range would be similar.

After mounting the devices to the wall, I set up a few basic automations and enabled notifications. All I had to say was “wow!”. The devices had an almost instant response time and triggered automations right away. Given that the Hub is Wi-Fi and not Ethernet-enabled I had concerns there about communication but for once I am actually happy with my NBN service.
DAY TO DAY USAGE
Given that the devices are currently located in my bedroom I put them to good use with automating my lights to come on when motion is detected or a door is opened. I further automated these using the Home+ app but that is for another time.
Since then I’ve noticed myself rarely using my phone to control the devices as I have the automations scheduled exactly to my liking and at nights I can hold down the smart button and turn everything off.
I have faced a small issue with the button, that being that it sometimes fails to respond. I believe though that this is a common HomeKit problem as the button needs to communicate to the hub so it might be time to retire the old iPad Air and purchase an Apple HomePod. Other than that, it works exactly as expected and makes it much easier for those who aren’t as technologically competent to control the lights in my room. Additionally, with the lack of smart switches in Australia, these smart buttons are a great alternative for the time being.
The Hub also has a Smart IR feature to be able to control infrared enabled devices, such as TVs and Air Conditioners, with the Cygnett Smart App, however, I am yet to use that feature and do not intend to use this feature as you cannot use the Apple Home option and Smart IR option at the same time.
Other than this, the Sensors help me keep an eye on my room when I’m not at home so I know when someone is going in there without my knowledge. Next up is to add a security camera.
COMPATIBILITY WITH OTHER SYSTEMS
The box does say that the devices are compatible with Amazon Alexa and Google Home. I do not use Google Home but I do have an Amazon Echo which I did link the Cygnett Smart Skill to. However, it only exposed the Door Sensor and Temperature Sensors which I did not intend to use. I did create an automation to have Alexa announce when the door is opened though. Needless to say, I disabled that less than a day later. If you do want to use the Button and Motion Sensors with Alexa this probably isn’t the product for you.
FINAL THOUGHTS
Ultimately, the Cygnett Starter Kit is reasonably priced and the devices are very affordable which make them a perfect addition to any HomeKit setup. Like all technology, the devices have their advantages and disadvantages.
Pros
- The Cygnett Smart Range uses the Zigbee protocol meaning that all devices connect to one central hub rather than connecting individually to wi-fi.
- Individual devices are cheaper than similar devices on the market such as Eve and Logitech.
- Can all be controlled solely from the Apple Home App.
- Cygnett customer service as extremely helpful and they have a range of videos online to support customers.
- Starter Kit comes with all the tools to set up the hub including power cord and screwdriver as well as extra adhesive.
- Cygnett Smart App records button presses, motion detection logs and door open and closing logs.
Cons
- Hub connects to Wi-Fi rather than Ethernet which could cause communication issues. However, I am yet to face them.
- The 3M adhesive can only be used once and after removing it to access the battery compartment you need to find another way to stick them to the wall again.
- Button sometimes fails to respond however this is a HomeKit issue, not a Cygnett issue.
- You can’t use Apple HomeKit and the IR Option for the hub at the same time. Additionally, you cannot control IR Devices connected to the Hub in Apple Home.
Despite this, I’d highly recommend the Cygnett Smart Hub to anyone looking to expand their smart home. With a lack of many notable brands in Australia, Cygnett is the best alternative to them and features many of the same devices. Fingers crossed, one day we’ll be able to get a Water Leak Sensor and Vibration Sensor added to the range.
If you have any questions about the hub feel free to leave a comment below and be sure to check out my unboxing of the hub on YouTube.
how much