SwitchBot Mini Robot Vac K10+ Pro (Review)
Today’s post marks the first (of many, perhaps?) review of a smart robot vacuum on HomeKit News, despite having owned one for four years. This isn’t exactly a surprise, as HomeKit doesn’t support robot vacuums – at least not fully. Maybe when iOS18 drops, we’ll see better support, but don’t get your hopes up. Putting those things to one side, today’s review is for the SwitchBot K10+ Pro, an update to the K10+ that adds a few improvements here and there, but not ones that would be worth upgrading for, if you already have the K10+. It’s still a decent piece of kit, and one that whilst initially frustrating, does help in ways that my other now ageing Roborock S6 couldn’t. Read on to find out in what way…
PACKAGING | CONTENTS

Considering the package sent to me came from China, the box survived pretty well, as did the contents, thankfully. There’s not a lot to see, but everything required was included. I was also sent a SwitchBot Hub 2 for the purpose of testing the K10+ Pro out, which you won’t get, but is also not a requirement unless you plan to add it to Apple Home. That may not be worth it at the time of writing, but may make all the difference with iOS18.


The main piece is the robot vac itself, which only comes in white. Visually, it’s pretty much the same as the previous model, except for the larger front docking sensor. Similarly, the docking station is fairly similar to the previous iteration, with just a different fascia, now grey instead of black. You get two side brushes (one of which is a spare), a main manual and a quick setup/reference card, a Hepa filter (one is already installed in the vacuum), 30 disposable mopping pads for wet floor cleaning, and a pair of disposable dust bags. That’s pretty much it.
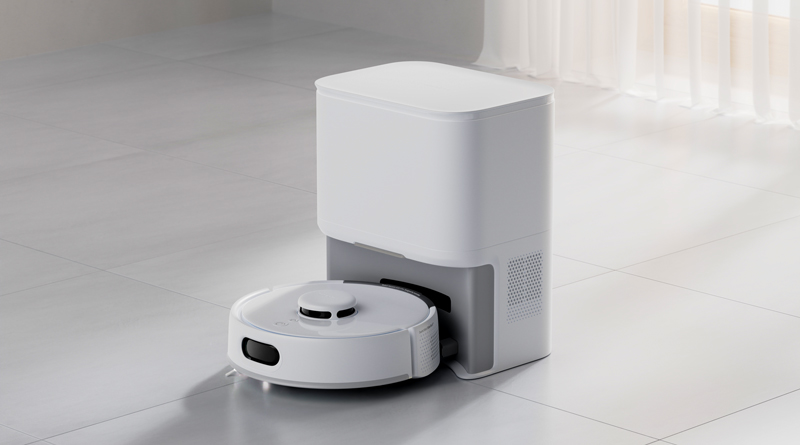
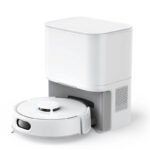
THE VACUUM

In many ways the K10+ Pro looks much like any other robot vac out there, with a LiDAR unit on top, front ‘bumper’, sensors around the edges, and a corner brush. Where it differs to most other models is down to its size. I have been using a Roborock S6 for a while and it has served me well, but it’s slightly too large to reach certain places, most notably when it fails to get between the legs for our dining chairs. It’s just slightly too large. The K10+ series (both models) are 34% smaller, and so getting into these narrower gaps is not an issue. Now I no longer have to put the chairs on top of the table when I need to get a robovac to do its thing, and that’s a big deal for me.

There are two main buttons on the top, much like other vacs, with a Power and Home button, but actually the housing around the LiDAR sensor is also a button which can be pressed down, although typically this is usually only when you’re setting or resetting the device.

There are vents either side of the unit, although one is home to a small speaker for the robot to communicate the actions it’s taking, like cleaning, returning to the dock, or for alerts if it gets stuck.

The rear is home to the dust box. This also has a shutter that only opens when it’s connected to the base station, which is also when the internal battery is being recharged. This is achieved via two metal connectors either side of the aforementioned shutter. Whilst the dust box is set up to be emptied automatically via the docking station, you can actually empty the contents of the box yourself, and forego the cost of further disposable dust bags, although considering you shouldn’t need to replace these bags for 90 days, I think it’s worth the ongoing costs versus the potential issues you might encounter emptying the contents yourself, as I’ve had to do with the Roborock S6. At the top of the dust box is another docking sensor, as the K10+ Pro has to reverse into the dock.


The top of the robot has a removable plate that reveals an on/off toggle switch as well as a way to access the dust box, which is lifted out via a fold away handle. The underside is home to a pair of powered wheels, a directional wheel, and three edge or ‘cliff’ sensor – one set either side, and one at the front. This is designed to prevent the robovac from falling down a flight of stairs, if you’re using it on an upper floor, for example.
IMPROVEMENTS OVER THE K10+


If I’m honest, whilst I’ve never tried the original K10+, if I were to have one, I don’t think the improvements afforded the K10+ Pro are worth the upgrade. If you don’t own the K10+, then going for the Pro model makes total sense of course. Visually, they’re much the same apart from the differences already mentioned, but they have beefed up the suction power, going from 2,500Pa to 3,000Pa. That doesn’t seem a lot but it’s a 20% increase overall. SwitchBot claim its ability to clean further into corners has been improved, although given the brush attachment looks the same, I’m not sure how that has been achieved, unless it’s to do with the improved suction.
They have changed the sweeper from a combined rubber blade and coarse brush, to an all rubber design, which appears to work better with hairs apparently. Whilst the LiDAR sensor hasn’t changed in and of itself, the robot does now also use PSD (not the Photoshop file format…), which stands for Position Sensitive Dectector. This is charged with better avoidance of objects, and knowing where it is, if it has been moved to a different location. I personally haven’t noticed it being any better than my S6 in this regard, although it’s definitely faster at getting around, and with the S6 only capable of 2,000Pa, the K10+ Pro is 50% more powerful.
THE DOCKING STATION

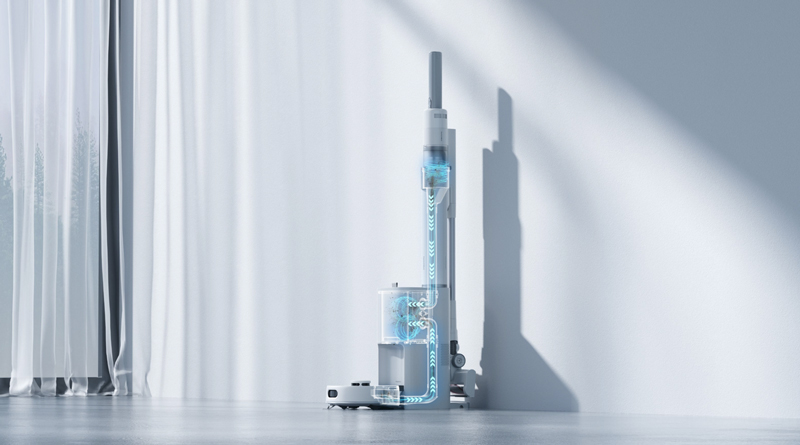
My Roborock has a docking station, but it’s merely there to recharge the internal battery for the S6. With the K10+ Pro, you get a bit more, as is clear from the size of it. It has the connectors for recharging, as standard, but in between these two connectors is a large port. This connects to the port on the robovac, to suck out all the dust, dirt and hairs collected, and store them in a disposable bag in the top section. Above this port is also what I guess is a sort of transmitter to guide the robovac back for recharging.


The top section has a lid, and once opened you can see the rather cavernous space granted for the disposable dust bags. The bottom of this section has a fan to draw the dust into the bag from the vacuum’s dust box, via the evacuation tube. Fitted inside the lid is a mopping pad clip plate, although I’ll be honest and say if you’re looking for a robovac that can also do a deep clean via the mop, this isn’t the type of model that’ll work for you.


The bags that work with this base station can collect up to 90 days of dust and hair, although that really depends on a variety of factors. It’s pretty easy to fit, and once installed you don’t even think about it, although I’ve found myself checking how full it is on occasion (OCD much?).


the inside of the dust bag holder is a mopping pad clip plate. If you want to give your floors a cursory wipe, you can remove this plate, wrap a mopping pad around it, and clip it to the base of the robovac. It’s positioned to fit over the rubber brush, so effectively you can mop or vacuum, but not both at the same time. As stated, I’m not convinced this is worth using, and even though my Roborock S6 has a similar set up, the application of disposable pads is a lot more well thought out, as the S6 has a clip on module that also contains a small water reservoir that slowly leaks water onto the mopping pad. So as it stands, in the absence of a dedicated robovac with fully dedicated mopping functionality, the K10+ Pro does the vacuuming, whilst the S6 is now designated with wiping the floors when required.
When it comes to the base station doing what it’s meant to do, it’s actually a lot more pleasant of an experience than I’d anticipated. Prior to this device being sent, I would dutifully empty the dust box for the Roborock S6 after each clean. This would first involve wrapping a disposable plastic bag around the box, shaking the contents of the box loose, so they’d end up in the bag, then dispose of the bag, once sealed. This would often result in some dust getting out, and going up my nose, and boy do I have sensitive sinuses! As you can imagine, it wasn’t great, but it was the best way to deal with the collected dust. Now with the K10+ Pro able to do it for me without any intervention, it’s one less hassle, for which I’m grateful.


Wrapping up the features of the base station, the box also contains a small blade/brush combo to cut tangled hairs from the rubber cleaning brush. The rear of the unit has a fitted power cable. I was sent the UK version with a Type G plug, but it works fine with an adaptor, so I’m ok with it.
IN APPLE HOME


At the time of writing this review, I’m still on iOS17, so if the next iteration of iOS comes with better integration, I’ll update this section of the review to reflect any changes – good or bad. I guess Apple Home integration can’t get any more basic though, so I have high hopes that things will improve. As it stands, to get the K10+ Pro into Apple Home, you have to associate the K10+ Pro with one of SwitchBot’s own Matter hubs. This is also where it can get a bit confusing; most SwitchBot devices use Bluetooth, and so they need these hubs for both their own ecosystem, and for third-party Matter ecosystems. The hubs are Matter enabled, allowing the devices connected to them to be exposed to Apple Home, which is much the same as Aqara Zigbee devices, and how they interact with their own Zigbee hubs. However, the K10+ Pro uses WiFi, so it actually doesn’t need a hub, or so you would think. For SwitchBot’s own ecosystem, it doesn’t – unless you want it to work with other SwitchBot devices – in which case you’ll almost certainly have a hub anyway. To expose the robovac to Matter platforms like Apple Home, you need the hub, so even if the vac isn’t connected to the hub via Bluetooth, in the app it’s part of their ecosystem, and is therefore able to associate with the hub for the purposes of getting it exposed to Apple Home.
What you do get is minimal, however. You get a tile, which can be displayed as a power outlet, a light, or a fan, so not exactly representative. To be clear, this is not the fault of SwitchBot, it’s simply due to Apple Home not being ready for robot vacuums in iOS17. Beyond that, there’s a toggle switch that does the same as the tile, a settings page that allows you to include the device in scenes and automations, and a tab to show that it’s connected to a SwitchBot hub.
Pressing the icon on the tile, or toggling the switch, simply activates the vac to clean the whole home (once you’ve actually set it all up of course). There are no options to clean specific rooms as such, so you only get the option to get it to start cleaning, or stop cleaning and return to the docking station. Luckily, as the SwitchBot app offers the chance to use Siri Shortcuts, so there is more that can be done, which I’ll touch on next.
THE SWITCHBOT APP


Things are different in the SwitchBot app, which is to be expected. You get a single tile on the home page, which allows you to launch the robot to do a full clean (by pressing the circular button), without having to go deeper into the app. Tapping anywhere on the tile other than the circular button launches a pop up that gives you three options – Clean, Finish, and Recharge. Pretty self explanatory. Tapping on ‘More’ launches the full range of options.
Assuming you’ve set up the robovac and have mapped your home, you’ll get the floor plan on the home page. The app will automatically break up the plan into rooms, although you can edit it yourself too. Beneath that are metrics to tell how much floor has been covered on its last clean, how long it took, and the estimated area based on the whole plan.
At the very bottom are four buttons; Charge, Clean, Max, and More. The first two allow you to send the vac back for recharging its battery, and begin cleaning, respectively. Max is actually the option to choose from four different cleaning strengths; Quiet, Standard, Strong, and Max. The More button opens up additional options.
You get buttons either side for cleaning modes (vacuum or mop), empty the dust box, how many times the cleaning task is to be performed in one session – with a maximum of two. My Roborock is capable of three cleaning passes, but it does have a much larger battery. You can save the current map, as well as set no-go zones, which is useful for areas where you might want to keep the vac away from.


once selected, the previously mentioned ‘More’ button opens up additional features that allow you to edit your current map, choose from other stored maps, create schedules, or show a cleaning report. You can choose from a selection of voices in different languages, which includes English (US accent), three Japanese voices, Korean, Hokkien (a Chinese dialect), Taiwanese Mandarin, German, Spanish, French, Italian, and Dutch.
The page also allows you to directly control the robovac with a three button controller that allows you to steer it. Finally, you can choose between a whole house clean, clean individual rooms, and select what order they’ll be cleaned in, and even clean a specific area.
Having been used to the UI of the Roborock app, at first I felt it was better than the one presented by SwitchBot, although I’ve come to appreciate the options to quickly access certain functions, that in the Roborock app require a big more digging. All that said, the one area Roborock’s app is arguably better is with Siri Shortcuts. With SwitchBot, you can start, pause or resume cleaning, return it to the dock, pause docking, locate the robot, change the suction power, or change the cleaning mode. What you can’t do is create a Siri Shortcut that allows you to ask the robot to clean specific rooms. Roborock does offer this, and so I can tell my Roborock S6 to clean the main bedroom. For SwitchBot it’ll only offer to clean the whole apartment. Hopefully SwitchBot can update the options to include specific rooms at some point.
There are further options to tweak the way it cleans and empties, which as a summary, include;
- Do Not Disturb (no voice announcements or noises between certain times)
- Sound volume
- Dust collection settings
- Dust collection time – how long the docking station collects dust from the robovac once docked
- Dust collection frequency – how often it will empty the dust box (after 90, 75, or 60 mins of cleaning time)
- Child lock
- Button lights
PERFORMANCE IN DAY TO DAY USE
At first I wasn’t sure I’d like it, after coming from a very happy experience with the Roborock S6. That eventually changed, for a couple of reasons, but mostly due to its smaller size doing a better job of getting into areas I’d previously have to adjust every time I wanted to clean said area. Now it’s much easier to clean without having to temporarily hoist dining room chairs onto the dining table due to the space between the chair legs being a tad too small for the Roborock to contend with. I’m also really happy to let it clean the dust by itself, which is one less job, and one less messy one at that.
I wish the Siri Shortcuts options were better, as already stated, but with iOS18 it may not be neccessary (fingers crossed). I would say that whilst the object detect seems to be no worse than my S6, I thought it would be better, but it doesn’t appear to be an improvement. It will still bump into things that are clearly in its path, so the PSD option doesn’t seem to make any real improvements.
One area of frustration, which thankfully I no longer need to deal with is the vac not being able to find the docking station sometimes. This all happened early on in the process, and as such I eventually got to the bottom of the issue that causes it to happen. So when you’ve mapped out your home, you can set it off to go cleaning, but if you happen to try to make any adjustments to the floor plan whilst it’s doing so, it appears this screws things up for the vac in relation to the map and how to find the base station. In some cases this can be (relatively) easily remedied by deleting any maps currently in use, and remapping your home. If that doesn’t fix the issue, deleting the robovac, and re-adding it to the SwitchBot app is the remaining option. Since stumbling on this discovery, I’ve ensured that I don’t try to fiddle with the floor plan until its back at the the docking station, and so far I’ve not encountered the issue again, so feel confident that this was the issue, with a remedy to go with it.
Other than that, for the price, it’s pretty reasonable. Robot vacuums are fast becoming the most expensive item for your smart home, and prices for some are astronomical, even if the cost is justified. Still, we’re at a point now where SwitchBot now have a K10+ Pro Combo, which was just announced at IFA 2024. This ‘Combo’ includes the K10+ Pro that I’m reviewing here, but it comes with a modified base station that allows the also included handheld robot vac to connect to, and empty it. You can read more about it HERE. If like me you already have a handheld vacuum (we have a top line Dyson that it pretty darn amazing all by itself), then the combo may not be of much appeal, but if you’re not a fan of having to empty a vacuum of any type on a regular basis, and you’re in the market for a handheld too, this may be the perfect option.
Either way, the K10+ Pro has converted me, and so the Roborock is currently on standby only, with the option to do some mopping as required. Recommended.
SwitchBot K10+ Pro
Pros
- Matter compatible via Switchbot Hubs
- Smaller than all other robovacs
- Decent suction power for its size
- Base Station great for self emptying
- Fast mover
Cons
- Requires a SwitchBot hub for Matter integration
- Siri Shortcuts options could be better